i had my new kosugi neighbor, linda, over for dinner tuesday, so i made a big pot of chili on monday. i hope you're not thinking, "nice, laura, way to serve your guest leftovers," because it's no secret that chili tastes better the next day. this is a fairly good size recipe, maybe 6-8 servings. chili keeps really well (in the freezer, too), and i can eat it for four days without getting sick of it, so i always make a big pot. and for as unjapanese as this dish is, the ingredients are really easy to find and fairly inexpensive. chili is just really fun to make, and pretty foolproof. the reason why there are no how-to pictures is that there is really nothing complicated about the process. it's all about the spices; you should just keep tasting and adding things until it's exactly how you like it.
ingredients
250 g dry pinto beans (or 2 cans) (1)
1 tbsp olive oil
1 1/2 yellow onion, diced
1 red bell pepper, diced
5 small green peppers, diced
2 cloves garlic, minced
1 tbsp paprika (2)
2 tbsp cumin (3)
3 tbsp chili powder (4)
350 g ground beef
2 cans tomatoes (5)
1 bottle tomato sauce (6)
1 tsp salt
dash pepper
hot sauce to taste
(1)うずら豆, (2)パプリカ, (3)クミン, (4)チリパウダー, (5)ホールトマト, (6)トマトピュレー
i got the chili powder and hot sauce at yamaya in takaoka. everything else is from e-town in kosugi.
i listened to shaolin soul, volumes 1 & 2 while making my chili.
let's go!
1. a. buying beans--i've only ever found canned beans at foreign food groceries, and those were kind of expensive. kidney beans or even black beans would work, too. if you buy dried beans at the grocery, be careful not to buy azuki beans (小豆); the big ones kind of look like kidney beans. they're sweet and delicious, but not what you want for chili--pinto beans are tan with little dark dots. if in doubt, you can always hold up the bag and ask the checker if they are sweet. that's what i finally did :-/
b. cooking beans--if you bought canned beans, skip this part. for dried beans, rinse them and check to make sure there are no pebbles or weird freaky beans. soak for 4-6 hours in a bowl with a 1:3 bean to water ratio. then boil beans with a tsp of salt for about two hours, until tender. when they are finished, drain the water and gently rinse. set aside for the moment.
2. heat oil in a stock pot and add garlic, red pepper, green pepper, and onion. sweat until veggies begin to get tender (3-5 minutes)
3. add paprika, cumin, and chili powder. make sure keep stirring things around so that your spices don't burn on the bottom of your pan.
4. add the ground beef. some people freak out about the raw meat touching the vegetables, and it may well be wrong, but i do it all the time--no one has ever gotten botulised at one of my dinners. you'll be cooking it well done anyway, but if it bothers you, you can cook the meat in a separate pan and add it to the veggies.
5. when the meat is done, add the tomatoes, tomato sauce, beans, salt, pepper, and hot sauce. let everything get hot, and then turn the heat down to low.
6. now, this is the most important part. at this point you should stir everything up and taste. now is the time to add more cumin, chili powder, salt, hot sauce, or whatever you need. if you don't know what you're doing, just add a little at a time. also, if it is too thick, add a little water . if it is too thin, add tomato paste (トマトペースト). just keep in mind that it will thicken up overnight.
7. when it's just right, put it in the refrigerator. eat it tomorrow.
enjoy!
this is just how i make chili. it's really basic, and sometimes i add different stuff just for fun. salsa, beer, mustard, oregano, celery, worcestershire, and sausage are some things you could play with that would work. if you are not a cumin fan, you might want to hold back a little, because i love it, and i always put a lot in. anyway, linda seemed to like it. we ate this on rice when she was over, but where i'm from we eat it on spaghetti. it's also good on a salad with sour cream or over eggs.
Tuesday, August 28, 2007
chili
Tuesday, August 21, 2007
toro and tofu salad
last month, i was hanging out at max's house after our marine day weekend camping trip got rained out. i was feeling pretty miserable, sunburned and a little ill after an uozu banger done quite right. but then takashi saved the day with this amazingly delicious salad that, along with a bucket of bloody marys, perked me right up. it was tasty, yet simple and healthy, so i had to make it myself. it makes a great bento, too. 
ingredients
1 head leaf lettuce
1 block tofu
1 pack pounded tuna belly (1)
2 tbsp soy sauce (2)
1 tbsp sesame oil (3)
(1) ねぎとろ or まぐろたたき (2) しょうゆ (3) ごま油 or ごまあぶら
i got the sesame oil at marushin in takaoka. everything else is from e-town in kosugi.
i listened to nujabes--metaphorical music while preparing this.
let's go!
1. cut lettuce into thin strips and place first on the plate.
2. put tofu on top of lettuce. i cut my tofu into little blocks, but you could just as well leave it whole.
3. now, the tuna. toro is the fatty part of the tuna, and is definitely the most delicious. if you can't find it, go to the sashimi counter in the seafood section and ask for it. it should already be pounded up, so all you have to do is sprinkle it on the tofu.
4. pour the soy sauce and sesame oil on top. you should be able to get sesame oil in a regular grocery store--just ask for goma abura if you can't find it. if you are a tall blonde, the grocey girl may freak out when you try to talk to her, but you must resist the urge to backhand her. that solves nothing. talk to someone else who isn't a total hivemind basketcase.
enjoy!
this was just as good the second time. i sprinkled some sesame seeds on top when i had it for lunch the next day, and that gave it a nice texture--i recommend. takashi served a bowl of this with natto at max's house. not my jam, but he says it's great, so if you like natto, rock on. thanks for the recipe, takashi!
tomato, cucumber, and onion salad
it's been unbearably hot and humid for the last two weeks, so i thought i'd make something simple and summery. the cool, crisp taste of veggies and vinegar make this a wonderful summer snack. we all have food that reminds us of childhood, and this is one of mine. my mom used to make this all the time when i was growing up, and eating it reminds me of corn on the cob, fried chicken, ham and beans, cornbread, and fried okra. you know, the kind of stuff your mom probably made if you were lucky enough to be born in the south ;)
ingredients
1 tomato, wedged
1 cucumber, sliced
1/2 onion, julienned
3 tbsp red wine vinegar
1 tsp sugar
3/4 tsp salt
dash pepper
i bought the red wine vinegar at marushin in takaoka. everything else is from e-town in kosugi.
i listened to freakwater--old paint while making this.
let's go!
1. cut your vegetables. some people don't like skin on their cucumbers, but i do. however, japanese cucumbers have a bigger skin to flesh ratio than the cucumbers i'm used to, so i just cut half of the skin off in stripes down the length of the cucumber before slicing. also, i would prefer to use a red onion, but my grocery doesn't always have those. yellow works just fine. i put the onion on the bottom to make sure it gets thoroughly soaked in vinegar.
2. mix the vinegar, sugar, salt, and pepper together. you can adjust if there's too much/not enough sour/sweet/salty (i like things really sour and salty). also, if you don't have red wine vinegar, you can always find rice vinegar (in the aisle with all the sushi stuff). you'll probably have to adjust the proportions--rice vinegar is sweeter, and some rice vinegar has already been seasoned with salt and sugar.
3. cover and let sit in the refrigerator for a couple of hours. overnight is even better.
enjoy!
i had some of this for a late night snack and finished it off in the morning at breakfast. also, if you chopped everything into little pieces and maybe added some dill, this would make an nice little relish to put on fish. 
Thursday, August 9, 2007
omurice with béchamel sauce
i only started liking omurice yesterday. i think my aversion to omurice was due to the fact that it's full of ketchup. i've never been a huge fan of ketchup--it just seems to overpower everything. so i never even thought of making it at my house until joshie was telling me about how delicious his omurice turned out. i made a white sauce instead of using ketchup, and i think it turned out quite nicely. i only made enough for one serving because reheated eggs are not tasty. actually, there was a little too much filling and sauce, but i just ate it over rice in the morning, and that was a pretty good breakfast. 
ingredients for the béchamel sauce
25 g butter
25 g flour (1)
200 mL milk
pinch salt
pinch nutmeg
ingredients for omirice
2 large eggs, beaten
1/4 red bell pepper, chopped
1/4 small yellow onion, chopped
130 g chicken
clove garlic, minced
pinch salt
pinch dried red pepper
rice
vegetable oil
(1)フラワー
the nutmeg was here when i moved in. i got the dried red pepper at daiso. everything else is from e-town in kosugi.
i listened to gang starr--daily operation while cooking this dish.
let's go!
making the white sauce
1. béchamel sauce is really important because you can use it to make lots of other sauces. it's basically scalded milk thickened with roux. traditionally, an onion studded with cloves is used to flavor the milk, but i don't know where cloves are, so i wasn't too worried about it.
2. first, the roux. melt butter in a sauce pan. when it gets bubbly and frothy, add the flour.
3. mix the flour in with a wooden spoon. the goal is smooth and very thick with no flour chunks. keep stirring over heat for a couple of minutes, and then set aside.
4. bring the milk almost to a boil. add it to the roux while whisking vigorously. if your sauce gets too thick, you can add a little hot liquid (if you don't have any more milk, you can use a bullion cube dissolved in some hot water). add the salt and nutmeg.
making the omurice
1. cut up the chicken into small pieces. marinate it in oil, salt, garlic, and dried red pepper. i love the dried red pepper rings, and this time i followed seth's advice and used kitchen shears to cut them up.
2. sauté the chicken, onion, and bell pepper in a pan or wok over high heat.
3. turn the heat down a little. mix in the rice. ok, i really have tried to go metric here, as i am now living in the rest of the world, but how do i measure cooked rice? anyway, i used enough rice to fill up one of those ridiculously tiny beer glasses you get at enkais.
4. mix in about 50 mL of béchamel sauce until it all kind of sticks together.
5. in a separate pan, heat up enough oil to coat the bottom of the pan. pour in the eggs. spread the egg around, and make a thin omelet. put a couple ladles of filling in the middle, and fold over. carefully slide on a plate . it was all a little fast to take pictures, but i pretty much did what this guy did, except for the part where his comes out perfectly.
6. spoon some sauce over the omurice.
enjoy!
the sauce worked well with the omurice. my omelet wasn't as pretty as i hoped, but it was my first time, so hopefully i'll get better. it was really delicious though. i think it would have been good with some spinach, mushrooms, or tomatoes inside, too. i definitely want to experiment with different kinds of fillings in the future.
Sunday, August 5, 2007
bubble & squeak with mushroom cheese sauce
i've had niko staying with me for a few days already, and i invited max to stay over friday night for dinner and a movie. i'm not a huge breakfast person, but i thought having two hungry boys at my house in the morning would be the perfect time to make some bubble & squeak. when i worked at the pub, i used to eat it with cheese on top, which was super yummy. i had some mushrooms, so i thought i'd make some mushroom cheese sauce to put on top, too.
ingredients for bubbles
6 potatoes
40g butter
100 mL milk
2 tsp salt
1 tsp pepper
1 clove garlic, minced
1 red bell pepper
2 green bell pepper
1 medium yellow onion
ingredients for sauce
2 eringii mushrooms (1)
10 grams butter
250 mL milk
200 g shredded or grated cheese (not mozzarella)
pinch of salt
dash of pepper
(1) エリニギ
i bought all these ingredients at the jusco in takaoka.
for added deliciousness, listen to morcheeba--big calm while cooking.
let's go!
bubble & squeak
1. after doing some googling, i'm fairly certain this is not the traditional way of making bubble & squeak, but this is how i learned to do it, and also it's delicious so let's not argue about it. when we made bubble & squeak at the pub, we used mashed potatoes from the night before. unless you usually have mashed potatoes lying around at breakfast time, you're going to have to think ahead and make some up the night before.
2. peel and quarter the potatoes. boil for about 45 minutes. when the potatoes are done, you should be able to easily crush them with tongs.
3. drain and mash the potatoes. if you don't have a masher, you can use a fork, a whisk, or one of the beaters from an electric mixer. add the milk, butter, salt, pepper and garlic. you can tweak the amounts on these ingredients according to your tastes; however, i would advise you to hold back on the milk and butter as too much of these things will make your bubbles fall apart.
4. chop the bell peppers and the onion. sauté in butter until tender--the onion will start to become translucent.
5. you should let the mashed potatoes and the onion-pepper mixture cool overnight. in the morning, mix these together. use your hands--it feels funny.
6. use the mixture to make patties about 2 or 3 cm thick. i made 6 big ones out of my mixture, but in retrospect, i think i should have made 8 or 9 medium sized patties. you probably don't want the diameter to be bigger than the width of your spatula.
7. it's probably a good idea to go ahead and make your sauce now and then come back to finish up the bubbles.
8. melt about 20g of butter in a heavy skillet. brown bubbles on both sides. ok, so that sounds really easy, but here's the deal--the bubbles are going to stick to your pan. you will have a lot easier time if your bubbles are small enough to fit on the spatula. also a plastic spatula doesn't seem to cut it--use metal. if you have a second spatula, big wooden spoon, a okonomiyaki spatula, or a rice paddle, use that to kind of hold the bubble in place while you scrape from underneath. hopefully, they will stay in one piece with nice brown circles on both sides, but check out this picture.
9. yikes! i mean, the one on the top left isn't too bad, but what happened to the poor little guy on the bottom? yeah, i messed up. i think it was one of these things: i forgot about the butter in the veggie mixture and put too much in my mashed potatoes, i made my patties too big, and i tried to use a plastic spatula. anyway, if your bubbles look like this, don't worry. you'll be covering them with sauce, and the boys both agreed they were very delicious anyway. so, speaking of sauce...
mushroom cheese sauce
1. chop the mushrooms and sauté until tender. turn off the heat.
2. add the milk slowly while stirring quickly. heat up to just before a boil, and then turn off the heat.
3. stir in the cheese. i used a cheddar type mix that had a picture of omurice on the package and a little leftover summer comté, shredded. you could also use parmesan or shred those little baby cheese squares. whatever you do, don't use the ubiquitous pizza cheese. it will clump up and you will be left with hot milk with a ball of gooey cheese.
4. add salt and pepper.
enjoy!
i served the bubbles with scrambled eggs, wilted spinach, and pan fried tomatoes. i just poured the sauce over the whole thing. it was pretty delicious--we ate everything and then laid around in a dazed food coma.
Saturday, August 4, 2007
huevos rancheros
i've had a vegetarian at my house for the last week, so i haven't really been eating a lot of meat. but he cooks pretty well, so i haven't really been missing it. it's been ungodly hot around here, and i really didn't feel like going to the grocery one afternoon. niko rummaged around the cupboard, and this is what he came up with. yummy!
ingredients:
1 tbsp olive oil
1 yellow onion, chopped
1 clove garlic
2 tsp chili powder
2 tsp cumin
1 tsp paprika
1 tsp black pepper
1/2 tsp salt
1 can black beans
3/4 can corn
3/4 can stewed tomatoes, chopped
4 eggs
cilantro (1)
(1) コリアンダー
the chili powder, olive oil, and black beans are from yamaya in takaoka. the cilantro is from himi vicki's garden (but i've also found it in jusco in tak). everything else is from jusco in takaoka.
for added deliciousness, listen to manu chao--clandestino while cooking.
let's go!
1. sauté the onion and garlic in the olive oil until tender. the onions will look kind of translucent.
2. add the chili powder, cumin, paprika, pepper, and salt. mix in, and let the flavors cook into the onion for a few minutes.
3. turn the heat down. add the beans, corn and tomatoes. black beans can be a little hard to find sometimes (and expensive), but you can usually find pinto or at least kidney, and i think either of those would taste just fine. niko wants me to tell you you can use fresh tomatoes, but make sure not to throw out the larval looking stuff on the inside.
4. stir everything together, but don't stir like this unless you're trying to be silly.
5. let everything cook over low heat for awhile, until everything cooks down kind of thick and out-of-focus like this.
6.now that the beans are done, you can make the eggs. mine were over medium, but you can make them however you want. silly faces are not necessary, but encouraged.

7. slide the eggs on top of a plate of rice.
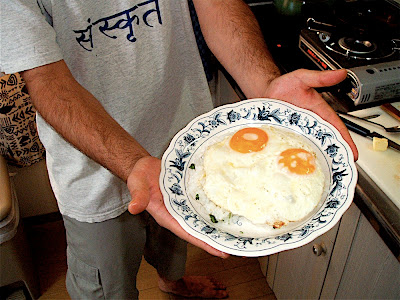
8. spoon some bean mixture on top.
9. sprinkle some cilantro on top. now, cilantro can be hard to find sometimes, so when i see some, i just grab it and make something. if you're going to go searching, note that cilantro in japanese is not shirantoro, but korianda, because cilantro is the leaf of the coriander plant. but if you don't have cilantro, don't worry about it. this dish is still very yummy without it. i usually pull the leaves from the stems and then chop, but you can skip the first step, which is much faster.
enjoy!
we ate this with a spoonful of salsa. we lamented our lack of cheese or sour cream, which we both agreed would have set things off quite nicely. it was still very delicious. a couple days later, we had some leftovers with a dollop of guacamole, and that was really good, too.
Tuesday, July 10, 2007
yakisoba
yakisoba is amazing camping food for many reasons. the ingredients are simple and cheap. it can be made in huge batches. it's almost impossible to mess up. it's delicious! at the leavers weekend, i made yakisoba for 70 people. well, me and a small army; it's not really a task you want to tackle alone.
ingredients
4.5 kg pork, sliced thin
8 cabbages
18 carrots
12 yellow onions
10 eggplants
6 packs bean sprouts
20 3-packs yakisoba noodles
6 bottles yakisoba sauce
1 bottle vegetable yakisoba sauce
1 liter canola oil
everything on this list is from jusco in the aeon in takaoka. if you order a few days ahead of the time, they will have it all boxed up and ready to go the day you need it.
let's go!
1. you will need to bring along a guy who hits the gym a lot to help you carry this stuff, like your fellow social rep.
2. when you arrive at the campground, recruit a small group to cut the vegetables. remind them to keep the pieces small and to keep the eggplant separate, but other than that, leave them alone. you have to start some fires.
3. you will need to get four fires going. get adam to stack the coal in just the right way. let him squirt the firestarting gel, because that is the fun part.
4. bunni will also really get into starting the fires, so grab her, too. don't let her hurt josh when he suggests that she should twist the paper, and not crumple it. she hasn't seen "the great outdoors", and thinks he is just being an asshole.
5. the coals are hot, and the veggies are cut. let's get going. put a griddle over each stack of coals and let it get hot.
6. you will need to make the no meat batch first. otherwise, the griddles will get porkified, and the vegetarians will riot. hand the bag of eggplant and the vegetable sauce to the herbivores, and let them make their own stuff. they might start doing yoga and other weird hippie stuff, but just ignore it. you have work to do.
7. you should make sure there's a person at each griddle. you need to pour about 30 mL of oil on the griddle and spread it around. your griddle person might say, "wow! that's a lot of oil." it is a lot of oil, but it's a big griddle. hopefully they will eventually appreciate the ease with which they move the food around.
8. throw about 500 g of pork on the griddle. then add big handfuls of onion, carrot, cabbage, and bean sprouts. let that cook awhile. people may make comments about your apron, but that's ok. you will get the last laugh when you make it through 12 batches of yakisoba with nary a stain (ahem, niko). 9. make sure your people know to fan the coals if things start to get cool. the cardboard from a six-pack is a great tool for this job.
10. when the vegetables start getting soft, squeeze out a big bunch of yakisoba sauce. then add three-five packs of noodles. don't forget, plastic wrappers in the blue garbage bags!
11. when all that is warm and mixed together, remove from the griddle onto a serving pan. it is true what they say--canadians are very nice people. one will probably volunteer to do this job without being asked.
12. put serving trays on benches. you may have to call for people to eat a few times, but they will come--all at once.
13. people will serve themselves directly off the griddle. this is fine--they can keep an eye on the yakisoba--maybe.
14. if you are asked by a japanese person if you are making japanese yakisoba, gently remind them that yakisoba is japanese, so yes. if they persist in nagging you about "the japanese way," put them to work, and tell them to make sure it's done right.
15. make sure you bring enough plates. if you run out, people go crazy and will try to eat off of any smooth surface.
16. enjoy!
Sunday, July 8, 2007
shitake & bell pepper gyoza with chevre cream sauce
goat cheese is so amazingly delicious, but at 800 yen for 110 grams, it's not something i often indulge in these days. i was in e-town the other day and spotted some goat cheese with half-off stickers. score! the limited selection and high price of cheese does suck, but i can't complain about the mushroom situation. the produce section always has a nice selection of mushrooms that are relatively cheap. i went with good old shitake this day. anyway, on with the cooking. ingredients for gyoza
1 pack (20) big round gyoza wrappers
1 pack (6 or 7) shitake (1)
1/2 red bell pepper
2 tbsp scallions, chopped (2)
50 mL balsamic vinegar
50 mL olive oil
1 clove garlic, minced
1/2 tsp crushed red pepper
1/2 tsp salt
ingredients for cream sauce
110 g goat cheese
200 mL milk (or cream)
200 mL white wine
2 tsp butter
2 tbsp scallion, chopped fine
1/2 tsp black pepper
1/2 tsp salt
日本語:(1)しいたけ、(2)にら
the balsamic vinegar is from marushin in takaoka. the white wine and olive oil are from jusco in takaoka. the red pepper is from from daiso in kosugi. everything else is from e-town in kosugi. just ignore the egg in that picture. i did.
gyoza
1. mix olive oil, salt, garlic, and red pepper. when i first came to kosugi, i bought a big bag of dried red pepper rings at the 100 yen store. these pack some serious fire (to sprinkle on ramen, maybe?), so i've barely made a dent. i crushed them with a mortar & pestle, but you could just chop them very finely. using the mortar & pestle makes me feel like a mad scientist, so i try to use it whenever i can. anyway...
2. rub the oil all over the shitake and red pepper. let it marinate for a bit.
3. while that's marinating, you can chop all your scallions. go ahead and put the scallions and balsamic together in a bowl.
4. put the shitake and bell pepper in your fish cooker on low heat. if you don't have a fish cooker, you can wrap them in foil and put them in a toaster oven on low, or cut them into pieces and saute. cook until tender and juicy.

5. cut the shitake and pepper into little pieces and mix together with the balsamic and scallions.
6. take one gyoza wrapper and rub the edge with a wet finger. spoon a bit of mixture in the middle. fold in half and press down on the edges to seal. you should make about 15 gyoza.

7. you will need to have some steamer setup. as you can see below, my setup is a bit ghettto, but it works. you will need a wide pan with a lid to boil water in. you will also need some sort of metal rack that is on legs or has some way to hold the food over the water. those crazy steamer pans that have the folding spiral layers are not good for steaming gyoza, but it is possible. be creative. anyway, get some water boiling in your steamer.
8. now, if you have timing issues when you're cooking, may i suggest that while waiting for your water to boil, you go ahead and knock out the sauce? just skip to the sauce recipe, and come back to the gyoza when you're finished, or if you have the skills (and 2 burners), you can do both at the same time. this will give you maximum warmness and freshness for both parts of your dish.
9. when your water is boiling, place the gyoza in a single layer (not touching) on the wire rack. put the lid on and let them steam for 5 minutes. you might have to do two batches. when you pull the gyoza off the rack, they will be really sticky. if you pull the rack out of the pan and let them cool a minute, it will be much easier.

10. ok, i didn't actually do this step because i like my gyoza just steamed and not browned. but here's how you do it. melt some butter in a skillet on medium heat and place the gyoza in a single layer in the pan. they should take about five minutes to brown on one side; keep an eye on them.
sauce
1. i have electric burners, which suck for making sauces and eggs. i now have a portable gas burner, the kind used for nabe. it rocks. i used a gas burner to make this sauce.
2. melt the butter in a skillet. throw in the scallions and cook until limp.

3. add the wine and reduce until it's kind of thick--it won't get thick like maple syrup, but it will definitely be thicker than wine.
4. add the milk (you really should use cream here, but milk is just easier to find). now here's the deal--the butter/wine mixture can get very hot. make sure that you use low heat, that you add the milk slowly, and that you mix the milk in quickly. if you don't, your sauce will break. it will be edible, but ugly. so just be careful. cook on low heat for a couple of minutes.
5. add the cheese, salt, and pepper. stir until the cheese is mixed in well.
enjoy!
serve gyoza with sauce spooned on top. i sauteed some asparagus and the other half of the bell pepper that had been marinated in the the same oil as the shitake. it went really nicely with the gyoza.

Wednesday, July 4, 2007
chicken and saffron dumplings
mmm...chicken & dumplings. i like to make things from scratch, but i don't mind telling you i've used bisquick every time--the mix makes perfect dumplings. unfortunately, bisquick is hard to come by these days, though i heard a rumor you can score it at the marushin in toyama shi. today we will make the dumplings from scratch. i threw in a little saffron just to make things fun. ingredients for chicken stock
1 carrot
1 stalk celery
1 onion
2 bouillon cubes (1)
1 tsp salt
1 tsp pepper
1 clove garlic, minced
1 pack boneless chicken thighs
60 mL milk
ingredients for dumplings:
350 mL all purpose flour (2)
2 tsp baking powder (3)
1/2 tsp salt
1 packet saffron
3 tsp shortening (4)
175 mL milk
日本語: (1) チキンコンソメ, (2) フラワー, (3) ベーキングパダー, (4) ショートニング
i bought the saffron at yamaya in takaoka. everything else i bought at al plaza in kosugi.
let's go!
chicken stock
you might be tempted to buy chicken breasts, or cut off that big piece of fat, but you're gonna lose a lot of flavor that way, so please refrain.
1. cut the carrot, celery (don't throw away those leaves!), and onion into big chunks--you need not make it pretty. don't cut up your chicken just yet. throw all ingredients except for the milk into a big pot. add water until just covered.
2. bring it to a boil, and then lower to a simmer. let that bad boy cook for 60-75 minutes. smoke a cigarette and have a glass of wine.
3. mmm, smell that? nice, yeah? ok, now you want to pull the chicken pieces out and set aside.
4. carefully pour the contents of your stock pot into a colander placed inside a mixing bowl. pull the colander out. check out your mixing bowl--that's chicken stock! poor the stock back into the stock pan. 5. you have a couple of options with the mushy veggies left in your colander. first, you can do what i always do, and throw them out. second, you can do what i did this last time, and kind of smash them through the holes of your colander into the stock. i think this last idea turned out just fine, and is less wasteful. whatever you do, the point is the broth should be relatively smooth, without chunks of mushy vegetables.
6. pour the milk in, stir a bit, and put the stock back on a burner turned very low, just to keep things hot. dumpling time!
dumplings
1. sift the dry ingredients together into a mixing bowl. 2. mix in the shortening--i find a fork to be a nice tool for this job. you'll know it's mixed well when there are no big chunks and it feels kind of mealy between your fingers.
3. now, mix in the milk. ooooooooh--magic! isn't that cool? i love saffron! don't get crazy with the mixing or your dumplings will have a weird texture. just enough that you don't have chunks of flour or pools of milk. now you're ready to get your hands messy!
the big show
1. bring your broth to just boiling--some kind of science happens when you drop the dumplings in, and it could get messy if you drop them into a rolling boil.
2. the dough is sticky (if it is too too sticky to work with, you can add a little more flour), so really the easiest way to do this is with your hands. pull a piece the size of one of those little mochi balls on a stick and flatten it to about 1 cm thickness in your hand. note: your dumpling may not be a perfect shape. don't worry about it.
3. gently drop the dumpling into the broth. it should rise to the top on its own and start getting bigger. 4. the dumplings will eventually take up the whole surface area, but just push them to the side with a spoon to make room for more. do not stir or otherwise play rough with the dumplings while they are cooking, or you might make gravy.
5. dumplings don't take long to cook, maybe 10 minutes. i always test by biting one--if it's good, they're done.
6. take the fat off the chicken and toss it. cut (or even better, shred) the chicken into tiny pieces. throw it in with your dumplings and mix it in a bit.
7. good work! spoon the dumplings into a bowl, and enjoy!